In the previous post we extracted a number of facial features from our webcam image. Now, we need a way to get the “labels”. So, we need to develop a semi-efficient data collection method to get our X-Y coordinate data.
As this project is a learning project at its core, I wanted to come up with a way to collect enough data for the model without having to spend too much time doing it, and without having to manually label anything. We also can’t collect too much redundant/repeated data because that will inflate our dataset size and make training take longer.
The plan
The basic idea is quite simple. If a render a target image at a known location, then we can record the X-Y coordinate to act as a “label”. If we also extract webcam features at the same time, then we have 1 data example. This is essentially self-labelling data.
Ultimately, we would know what the face/eyes/head look like when the user is looking at location X-Y on the screen. This is a very typical setup for eye tracking data collection: get the user to click on some location on the screen and record from the camera simultaneously. This is OK if you’re outsourcing the data collection to multiple people, but it would take a long time for 1 person to collect enough data.
What I decided to do was create a simple 2-part application for data collection.
“Calibration” mode
This is a very common mode found in research eye trackers. I call it “calibration” mode simply because in traditional eye trackers this is used to calibrate the device, but here we’re just borrowing the idea to record important screen locations.
Simply, targets are rendered at the most important screen locations to make sure the eyes are tracked correctly at those locations. Typically, you would use 9-point calibration, which consists of the center of the screen, the 4 corners, and midpoint of the 4 screen edges. In this mode, the application renders a target at these 9 locations and captures from the webcam when the user is gazing at those targets. This is slow, but it ensures that the most important locations are captured.
Data collection mode
This is where the majority of data collection occurs. We render a moving target on the screen. Then, every few milliseconds, we save its X-Y coordinate and webcam features simultaneously. We essentially want to paint as much of the screen as possible in the shortest amount of time.
There are many issues and decisions we need to consider when doing data collection. I’ll tag those points as we go with Issue.
The pygame loop
The application for data collection be found in my GitHub repo here. It is basically a pygame loop that renders targets and saves data N times every second. I’ll refer to this as “the main loop” throughout.
We instantiate a Detector object, which we created in the previous post. I also have a config.ini file that contains settings/options that are used across these various mini applications. Then we initialize pygame, start the loop, get features from the webcam/detector every frame, and update the display at some fixed framerate:
import pygame
from Gaze import Detector
from utils import get_config

SETTINGS, COLOURS, EYETRACKER, TF = get_config("config.ini")
detector = Detector(output_size=SETTINGS["image_size"])
pygame.init()

while True:
    screen.fill(bg)

    l_eye, r_eye, face, face_align, head_pos, angle = detector.get_frame()

    # ... do things here ...

    ticks = clock.tick(SETTINGS["record_frame_rate"])
    pygame.display.update()
The target
Next, we need to create a Target class, which is an object that we can render itself at specific screen coordinates, and can move in a straight line to new target locations.
Issue: we need a way to control the speed of the moving target. The target location updates every frame, but because webcam features are calculated on the main thread, there may be times where the frame rate drops, which ends up giving the target a variable speed. So in the move() method we have to make sure the target travels a fixed distance every frame:
class Target:
    def __init__(self, pos, speed, radius=10, color=(255, 255, 255)):
        super().__init__()
        self.x = pos[0]
        self.y = pos[1]
        self.speed = speed
        self.radius = radius
        self.color = color
        self.moving = False

    def render(self, screen):
        pygame.draw.circle(
            screen, COLOURS["white"], (self.x, self.y), self.radius + 1, 0
        )
        pygame.draw.circle(screen, self.color, (self.x, self.y), self.radius, 0)

    def move(self, target_loc, ticks):
        dist_per_tick = self.speed * ticks / 1000

        if (
            abs(self.x - target_loc[0]) <= dist_per_tick
            and abs(self.y - target_loc[1]) <= dist_per_tick
        ):
            self.moving = False
            self.color = COLOURS["red"]
        else:
            self.moving = True
            self.color = COLOURS["green"]
            current_vector = pygame.Vector2((self.x, self.y))
            new_vector = pygame.Vector2(target_loc)
            towards = (new_vector - current_vector).normalize()

            self.x += towards[0] * dist_per_tick
            self.y += towards[1] * dist_per_tick
“Calibration” mode
For the calibration mode, we first need to define the 9 screen coordinates of interest. This returns a shuffled list:
def get_calibration_zones(w, h, target_radius):
    xs = (0 + target_radius, w // 2, w - target_radius)
    ys = (0 + target_radius, h // 2, h - target_radius)
    zones = list(itertools.product(xs, ys))
    random.shuffle(zones)
    return zones

w, h = pygame.display.get_surface().get_size()
calibration_zones = get_calibration_zones(w, h, SETTINGS["target_radius"])
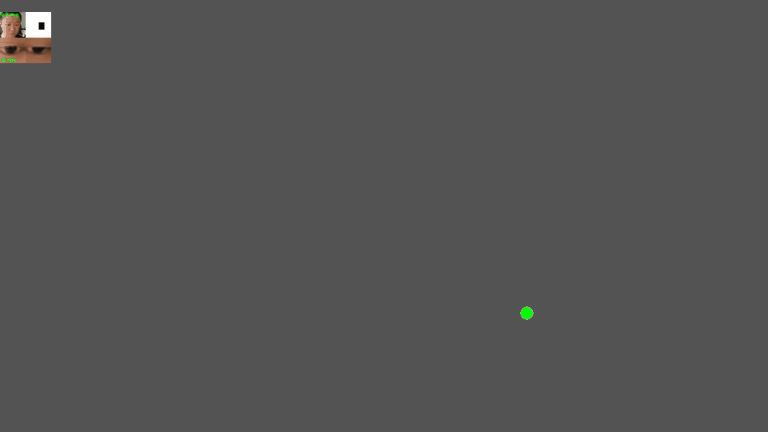
Then in the main loop, if calibration mode is chosen, we draw a target at the first location, and when the user looks at the target and presses space, the data (X-Y coordinate, and webcam features) is saved and the next target location is shown:
target = Target(center, speed=SETTINGS["target_speed"], radius=SETTINGS["target_radius"])
calibrate_idx = 0

# In the main loop ...

for event in pygame.event.get():
    if event.type == KEYDOWN and event.key == K_SPACE:
        if calibrate_idx < len(calibration_zones):
            num_images = save_data(...)
        calibrate_idx += 1

if calibrate_idx < len(calibration_zones):
    target.x, target.y = calibration_zones[calibrate_idx]
    target.render(screen)
Here is what calibration mode looks like in practice:

Corneal reflections
Issue: notice how in the gif above, the background colour fades from black-white-black. This is to deal with corneal reflections in the webcam images. Look at the reflection in the eyes of the 2 images below:


Notice how in the top image, there are 2 white reflections, while in the bottom image there is a single white bar. This is because I have 3 desktop monitors, and when all 3 screens are bright there is a bar reflection. But if my main (middle) monitor is dark, then the central part of the reflection is missing. Corneal reflections are actually an important part of the way traditional eye trackers work, but we have to be very careful about how we handle this here.
If, during data collection, we used a black background, what would happen during deployment/inference time, if I was using an application that had a bright background? I would see a drop in prediction accuracy because the model was never trained with such data.
We need to create variation in the type of corneal reflections being collected as part of our dataset, so we continuously alter the brightness of the data collection screen. You could go further by changing the brightness of the other 2 monitors, and also the background hue as well.
This adjustment is done at the start of the main loop, by sampling the background colour and increasing or decreasing it accordingly:
screen.fill(bg)

bg_origin = screen.get_at((0, 0))
if bg_origin[0] <= COLOURS["black"][0]:
    bg_should_increase = True
elif bg_origin[0] >= COLOURS["gray"][0]:
    bg_should_increase = False

if bg_should_increase:
    bg = (bg_origin[0] + 1, bg_origin[1] + 1, bg_origin[2] + 1, bg_origin[3])
else:
    bg = (bg_origin[0] - 1, bg_origin[1] - 1, bg_origin[2] - 1, bg_origin[3])
Data collection mode
During data collection we simply move the target around the screen and save data at each location. This is accomplished by just passing a new coordinate to the target object:
# In main loop
target.move((x, y), ticks)
target.render(screen)
However, there are many issues and pitfalls here…
Target speed
Issue: the first issue is a straightforward one. How fast should the target move? This is really quite subjective, but the goal is to strike a balance between the amount of data you collect and the accuracy of that data.
If you move the target too fast, your eyes will have a very hard time following it when it changes direction, which reduces the validity or your collected data. You need to make sure that your eyes are always looking at the correct screen location as the target moves.
If you move the target too slow, your eyes will have an easier time tracking. But then you’re collecting a lot of data at very similar screen regions. This is not a problem per se, but it does increase the size of your dataset (longer training times). You will also have to spend more time collecting data to ensure all screen regions are covered.
Target speed is controlled in the config.ini file, and the “correct” value will depend on the person and require some experimentation.
Region maps
Issue: We need to move a target around the screen, but what is the starting location of the target when first entering the mode? And where should it move to?
If we start the target at the center of the screen every time, then we would severely oversample the center. But not just the center coordinate, we would oversample all of the regions around the center as well, because no matter where the target is moving to it will always have to move through that region.
Ideally you want all screen coordinates to be sampled uniformly, but that’s unlikely to happen with a moving target as screen center is essentially connected to all locations on the screen. What would likely happen is the data samples would end up being distributed like a multivariate gaussian.
Instead, we would probably want to target screen regions that don’t have many samples to encourage a more uniform distribution. So we could create something like a “region map”. This is just a 2D array where each element is a screen coordinate, and the value is the number of data points that have been recorded at that location. Then we just increment that value when we save a new data point:
region_map = np.zeros((width, height))  # new region map

# When we record from a screen location, we just increment the value in that location of the map:
region_map[x_coord, y_coord] += 1
You can save and load this map (which is just a numpy array) between data collection sessions. Here is an example of what a region map looks like:
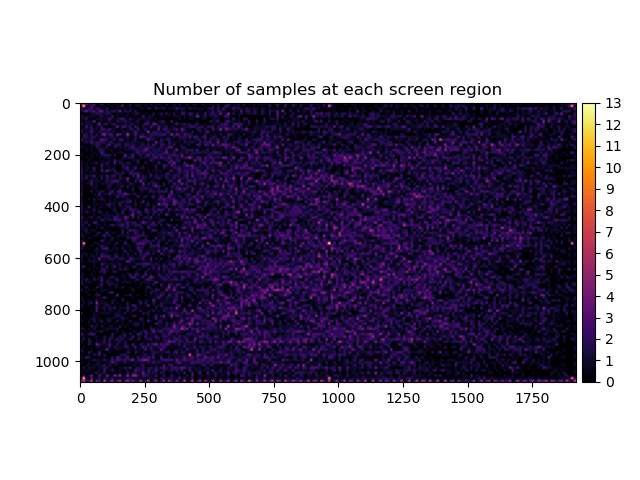
When choosing new target locations, we query the region map and choose coordinates with the fewest number of data samples:
def get_undersampled_region(region_map, map_scale):
    min_coords = np.where(region_map == np.min(region_map))
    idx = random.randint(0, len(min_coords[0]) - 1)
    return (min_coords[0][idx] * map_scale, min_coords[1][idx] * map_scale)

# In main loop....
center = get_undersampled_region(region_map, SETTINGS["map_scale"])
target.move(center, ticks)
target.render(screen)
Screen edges
Issue: the region map gives us a better chance of sampling coordinates that have low data representation, but it doesn’t solve our second issue, which is that screen center will still have more samples than desired. How do we increase the number of samples at the edges? There is a mild solution and a more extreme solution, both of which have been implemented.
In the extreme case, we simply only choose target locations that are at the 4 corners of the screen. This makes it highly likely that the target will move along the edges, or diagonally from corner to corner. This is basically a moving version of the calibration mode:
new_x = random.choice([0, w])
new_y = random.choice([0, h])
center = (new_x, new_y)

target.move(center, ticks)
target.render(screen)
A milder solution would be to increase the probability of sampling locations that are near the screen edges. We can use a Beta distribution for this. Beta distributions come in many forms, but we can choose parameters that result in a probability density function that has high probably near the boundaries of its range, and low towards the center, which is exactly what we want if we want to prioritize the screen edges:
from scipy.stats import beta

new_x = (beta.rvs(0.4, 0.4, size=1) * w)[0]
new_y = (beta.rvs(0.4, 0.4, size=1) * h)[0]
center = (new_x, new_y)

target.move(center, ticks)
target.render(screen)
Data variation
Issue: In order to create accurate predictive models, we need our training data to represent as many possible situations as possible. We need to be careful not to range restrict our data. Variation is good for creating robust models.
For example, if we only collect data in a well-lit room, the accuracy of our eye tracker will drop if we try to use it in a dark room. This is similar to the issue I described earlier about creating variation in corneal reflection. So this isn’t something we need to be careful with in creating the application itself, but in how we approach the actual collection of our dataset.
Creating variation in our dataset
We’ve been talking about “variation” in screen coordinate data in form of trying to keep it as uniformly distributed as possible, but you also want to create as much variation in your input features (i.e., webcam features) as possible. For example:
- Lighting conditions can be varied quite easily. You would want to collect data under well-lit and dim lighting conditions. Different lighting sources and angles of lighting are always useful.
- You need training data that captures a wide range of head angles, otherwise the feature will be too range restricted to be useful.
- The angle of your face with respect to the webcam. You want data where the webcam sees your face straight on, but also data where more of the side of your face is included in the image. I have found an office chair that can swivel to be useful for this.
- Vary the head position feature by collecting data where you’re sitting close to your monitor as well as relatively far away.
- We mentioned changing the background colour of the monitors to create variation in corneal reflection
- I even got a haircut half way through data collection…talk about commitment…
With all of that in mind, we can start using this mini application to collect our entire dataset. Here is what the data collector looks like in action:
Once all of the data has been collected, we can fire up PyTorch and create the model for our eye tracker.