Now that we have a general overview of the project, the first step in creating our eye tracker is getting video from the webcam. Following that, we need to perform face detection, alignment, and calculate various features from that video stream.
Webcam video
We’ll start by creating a Detector that uses OpenCV to retrieve frames from the webcam. By itself, reading from the webcam is quite straightforward:
import cv2
capture = cv2.VideoCapture(0)
capture.read()
However, reading webcam frames is a blocking action and can cause quite a lot of slowdown in our application, so ideally we would do that retrieval in a different thread.
In the code below, we create a thread that continuously reads from the webcam, and puts the frame into a queue. Then we can call get_frame() to retrieve a frame from that queue and process it however we need. This is the basic skeleton of our Detector class:
class Detector:
    def __init__(self):
        # Threaded webcam capture
        self.capture = cv2.VideoCapture(0)
        self.q = queue.Queue()
        t = threading.Thread(target=self._reader)
        t.daemon = True
        t.start()

    def _reader(self):
        while True:
            ret, frame = self.capture.read()
            if not ret:
                break
            if not self.q.empty():
                try:
                    self.q.get_nowait()
                except queue.Empty:
                    pass
            self.q.put(frame)

    def get_frame(self):
        frame = self.q.get()
        # ... process the frame here ...

    def close(self):
        self.capture.release()
What features do we need?
OK, we can capture webcam images, but what do we do with that? As we’re not using an existing dataset, we have some flexibility in terms of what inputs we pass into our model, but that also means we have to make some decisions about what features would actually be useful.
Face image
At the bare minimum, we need to perform face detection to isolate the face region. The biggest decision to be made here is whether a single face image would be enough. CNNs can learn image features, and combinations of those features, so on one hand a single face image would technically contain everything that we could possibly need. However, this would require a sufficiently deep network, which might be problematic because 1) webcam images don’t have the highest resolution, and 2) deep models are expensive to run in real time.
While a single face image might be enough for accurate eye tracking, we don’t know if this is necessarily true, and given that we need to collect the entire dataset ourselves, we might want to collect a few additional features at the same time so we have some flexibility when modelling.
Eye images
As we’re creating an eye tracker, it might be useful to extract images of just the eye regions so we can focus the model on those areas. These could be used instead of, or in conjunction with, the full face image. Passing a face image and 2 eye images might allow us to run a shallower model while still emphasizing areas that we think might be the most important.
Head angle and position
When working with faces, it’s pretty common to perform face alignment, which allows the network to ignore how the head is rotated. Head angle, however, might be necessary for an eye tracker because it interacts with eye movement. For example, the eyes could be looking to the right, but the actual location being looked at on the screen could be completely different if the head has 0 rotation vs. 45 degrees of rotation. A similar argument could be made for the position of the head in the frame, or how close the head is from the screen. So, if we want to work with aligned faces we might need to input head angle and head position into the model as well.
In sum, we don’t know exactly what features we will need, so we will collect the following to give us the ability to experiment with a few different models:
- Unaligned face
- Left eye
- Right eye
- Aligned face
- Head angle
- Head position
Thinking ahead to the modelling stage, we would want to keep the image features the same size here to make input stacking a bit easier when using models that have multiple inputs.
Face detection
The first step in this process is to isolate the face in the webcam image. The most common method for face detection is to use a Haar cascade classifier, which is available in many Python packages. In my experience, however, these methods tend to be quite inaccurate, especially when there is a lot of occlusion of the face, or when the face is not looking directly at the camera. Face angle is quite an issue in the case of an eye tracker because the angle can get quite extreme if the user is close to the monitor and looking at one of the screen corners.
Alternatively, there are a number of deep learning-based techniques for face detection. It might be worth experimenting with different methods to find what works best for you. In this case, we’ll use the CNN face detector that is available in the dlib package. The pre-trained CNN weights can be found either on the dlib website or in this projects GitHub repo.
We simply create an instance of the face detector (in the init method of our previous class) and load it with the pre-trained weights. Then we can get a frame from the webcam and pass it to the detector. The dlib CNN detector returns a list of rectangles, which contains the coordinates of the square region around each detected face:
import dlib

class Detector:
    def __init__(self):
        ...
        self.detector = dlib.cnn_face_detection_model_v1("trained_models/mmod_human_face_detector.dat")

    def get_frame(self):
        frame = self.q.get()
        dets = self.detector(frame, 0)
We can use those coordinates to crop out a region of the webcam frame for a face image. This basic face image will serve as one of the possible inputs to our eye tracker.
Facial landmark detection
Most of the remaining features we’ll calculate requires knowing where certain landmarks are on the face. These will give us access to individual eye regions, and the ability to calculate things like head rotation.
There are many ways of performing full landmark detection (see a review here), but the only landmarks we need for this are the locations of the 4 eye corners. dlib comes with a 5-point landmark detector (eye corners and nose), which we can use to get the eye coordinates.
Just like with the face detector, we can create a shape_predictor object and pass it the trained weights. Then pass a detected face region into the landmark feature predictor:
class Detector:
    def __init__(self):
        ...
        self.landmark_idx = OrderedDict([("right_eye", (0, 2)), ("left_eye", (2, 4))])
        self.detector = dlib.cnn_face_detection_model_v1("trained_models/mmod_human_face_detector.dat")
        self.predictor = dlib.shape_predictor("trained_models/shape_predictor_5_face_landmarks.dat")

    def get_frame(self):
        frame = self.q.get()
        dets = self.detector(frame, 0)

        if len(dets) == 1:
            # Get feature locations
            features = self.predictor(frame, dets[0].rect)
            reshaped = shape_to_np(features)

            l_start, l_end = self.landmark_idx["left_eye"]
            r_start, r_end = self.landmark_idx["right_eye"]
            l_eye_pts = reshaped[l_start:l_end]
            r_eye_pts = reshaped[r_start:r_end]
l_eye_pts and r_eye_pts gives us the coordinates of the 4 eye corners. We can also get an estimate of the center of each eye from those points:
l_eye_center = l_eye_pts.mean(axis=0).astype("int")
r_eye_center = r_eye_pts.mean(axis=0).astype("int")
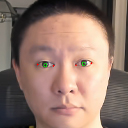
We can draw circles at each of these coordinates to confirm that they are correct:
Eye images
With the landmarks located, we can now extract images of the eye regions. What we want is a square image that is centered on each eye. Although we can use an eye-specific classifier to get the eye images, we need the landmarks anyway for the other features, so we might as well use that information to extract the eyes rather than running yet another classifier.
We can calculate the eye width as the distance between the eye corners, and use that width as the resulting image height to keep the image square:
l_eye_width = l_eye_pts[1][0] - l_eye_pts[0][0]
r_eye_width = r_eye_pts[0][0] - r_eye_pts[1][0]

l_eye_img = frame[l_eye_center[1] - int(l_eye_width / 2) : l_eye_center[1] + int(l_eye_width / 2),
                  l_eye_pts[0][0] : l_eye_pts[1][0]]

r_eye_img = frame[r_eye_center[1] - int(r_eye_width / 2) : r_eye_center[1] + int(r_eye_width / 2),
                  r_eye_pts[1][0] : r_eye_pts[0][0]]
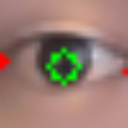
We now have a square image of each eye that can be used as eye tracker inputs:
Head angle
Next, we calculate the rotation angle of the head, which is very straightforward once we know the locations of the eye centers. This just requires a bit of trigonometry.
Let’s say we have a head rotated at some angle θ:
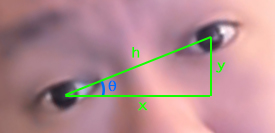
We calculated the width (h) from the previous section. As we know the coordinates of each eye center, we also know the vertical distance between the eyes (y), and the horizontal distance (x). We can use any of these known distances to calculate the angle θ. For example, θ = tan-1(y/x). In Python:
dY = r_eye_center[1] - l_eye_center[1]
dX = r_eye_center[0] - l_eye_center[0]
self.head_angle = np.degrees(np.arctan2(dY, dX))
Face alignment
The head angle can then be used to align the face image. We need to apply an affine transformation to both rotate and rescale the face so it appears horizontal (i.e., 0 rotation angle). dlib provides a function for performing this alignment, get_face_chip(), which is probably the simplest way of achieving this.
Manual rotation and scaling using an affine transform is, honestly, a topic far beyond my scope of knowledge. Fortunately, there are great tutorials online on how to do this (see here), which was what I used to implement the alignment. The following generates an aligned face as well as the unaligned face. The reason I manually applied the affine transform to the “unaligned” face as well was because the face detection from dlib was quite unstable without the rescaling and repositioning below:
desired_l_eye_pos = (0.35, 0.5)
desired_r_eye_posx = 1.0 - desired_l_eye_pos[0]

desired_dist = desired_r_eye_posx - desired_l_eye_pos[0]
desired_dist *= self.output_size
scale = desired_dist / eye_dist

eyes_center = (
    (l_eye_center[0] + r_eye_center[0]) // 2,
    (l_eye_center[1] + r_eye_center[1]) // 2,
)

t_x = self.output_size * 0.5
t_y = self.output_size * desired_l_eye_pos[1]

align_angles = (0, self.head_angle)
for angle in align_angles:
    M = cv2.getRotationMatrix2D(eyes_center, angle, scale)
    M[0, 2] += t_x - eyes_center[0]
    M[1, 2] += t_y - eyes_center[1]

    aligned = cv2.warpAffine(frame, M, (self.output_size, self.output_size), flags=cv2.INTER_CUBIC)

    if angle == 0:
        self.face_img = aligned
    else:
        self.face_align_img = aligned
Head position
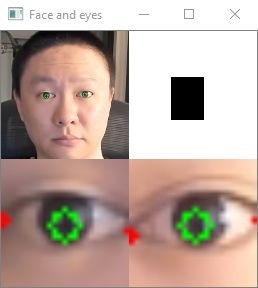
For the head position input, we can just create a white image with a black box indicating the size and location of the head, given we have all of that information already from the earlier face detection step. This feature was actually inspired by a smartphone eye tracking paper I read a while back, but I cannot for the life of me find the reference to it.
We simply create a white image, and draw a black rectangle at the location returned by the face detector. This should reflect both the lateral/vertical position of the head, as well as how close the user is to the camera (via the size of the rectangle):
frame_bw = np.ones((frame.shape[0], frame.shape[1])) * 255
cv2.rectangle(
    frame_bw,
    (dets[0].rect.left(), dets[0].rect.top()),
    (dets[0].rect.right(), dets[0].rect.bottom()),
    COLOURS["black"],
    -1,
)
The detector now calculates all of the features we need for modelling. If we want to optimize this in the future, we can figure out exactly which features are needed for our model and remove any calculations here that are unnecessary.
Now that we have the webcam features, we can move on to data collection.